
An Android App with a built-in computer vision system, for piloting DJI drones.
Get the APK
5 minute guide
Common questions
NO LONGER UPDATED
Eagle Eyes Pilot is compatible with DJI drones that support the DJI Mobile SDK 5, and can also run in Companion Mode. To understand the difference between the Eagle Eyes app in Piloting Mode and Companion Mode, see our FAQ here. See the table below for an overview of compatibility with different drones.
The Eagle Eyes app in Piloting Mode also supports autonomous flight missions on the DJI Mini 3, Mini 3 Pro, and Mini 4 Pro drones. See more in our Mini missions FAQ.
Eagle Eyes Mirada (the successor to our previous desktop app, Eagle Eyes Scan) can process recorded images and video from any drone, and can also run real-time detection via HDMI input from controllers that support clean HDMI output.
📋 See our compatibility page for desktop hardware and computer system requirements.
This table shows the compatibility of Eagle Eyes Pilot and Eagle Eyes Mirada for each drone/controller combination. See the legend below the table for what each status means.
📱 Android Requirements: Android 8+ with processor comparable to Snapdragon 855 (Galaxy S10 level), 6GB+ free storage. Not compatible with Google Pixel 6/7 phones due to DJI SDK bug.
Sources:
Eagle Eyes Pilot 1.5.0 - Full Walkthrough
Eagle Eyes Pilot is an app for first responders that runs on DJI drone controllers and Android devices. It has built-in computer vision optimized for search and rescue. and it integrates the drone with ground operations by connecting to CalTapo for real-time mapping. More recent additions include airspace awareness and live streaming, which we cover in separate videos.
Eagle Eyes Pilot
Eagle Eyes Pilot is an all-in-one drone app for Search and Rescue that detects color and motion anomalies in real time, and streams images and the live drone track directly to the team's CalTopo map, while the drone is still in the air.
Refer to our Setup instructions For Comprehensive details on how to download Eagle Eyes Pilot onto your drone controller. Activate your license. and configure Controller settings.
Starting the activation process:
Activating your license (QR code method):
Troubleshooting (manual activation):
If you don't have a device with a camera or the QR scan doesn't work:
⏱ Important: Complete the activation process within 15 minutes. Each activation session times out after that period.
See also activating Mirada and how to free up a device slot.
Connecting to CalTopo is optional. Separate from Eagle Eyes, CalTopo (also known as SARTopo) is already a great application for mapping and team situational awareness. If you have not tried it yet, we recommend creating an account and trying it out together with Eagle Eyes.
Connecting Eagle Eyes with CalTopo means everyone with access to the CalTopo map can see the drone's flight tracks and real-time location, and the drone pilot can fly with reference to the CalTopo map.
There are two ways to connect Eagle Eyes Pilot to CalTopo:
Option 1: Browser login. Quick, but temporary.
Option 2: CalTopo Service Account. A permanent login (recommended).
This gets you onto a CalTopo map for the current session. It is the quickest way to start, but the login is temporary, so you may need to sign in again later.
A Service Account gives your whole team a permanent login to CalTopo on the controller, so nobody has to sign in again before a search. You set it up once per team, and from then on a new controller goes from a fresh install to fully set up in under a minute. The video below walks through the whole process.
To set up a Service Account, you need:
This is a one-off. Once it is done, future team members only scan a QR code and pick the existing configuration.
On the controller
On your laptop, in CalTopo (you must be a team admin)
Back on the controller
Once your team has a Service Account connected through its license, new team members do not repeat the CalTopo steps. On a fresh install they grant permissions, name the drone, scan the QR code to activate the license, and pick the existing configuration. The permanent CalTopo login comes with it, and they are ready to fly. First time painful, second time not so bad.
Yes, you can switch between apps midflight.
From Eagle Eyes Pilot → DJI Pilot:
Use the in-app shortcut: Settings (hamburger menu, top-right) → Switch to DJI app.
From DJI Pilot → Eagle Eyes Pilot:
If you previously opened Eagle Eyes Pilot during this session, you can return to it by pressing the back button on the controller. It may take a few presses depending on what you did in DJI Pilot 2.
You can also swipe up on the screen at any time and toggle between apps manually.
We've seen that on the M30T and M350, the video occasionally does not load on startup - the user gets a black screen after clicking "Fly".
This may be fixed by switching to the DJI app and back, or by rebooting the RC controller. You can always fall back on the standard DJI piloting app if it persists.
If you are getting this issue, you can report it to info@EagleEyesSearch.com along with any relevant info (drone, controller, Eagle Eyes version, etc).
Yes, from within the Eagle Eyes Pilot app, this can be done even when flying offline. Your drone can be flown using either Eagle Eyes Pilot or DJI Pilot 2. Eagle Eyes Pilot automatically reads the DJI flight logs stored on your drone controller. Once you're back online, in just a few clicks, you can upload your drone's GPS tracks from that offline flight directly to your CalTopo map.
This feature is available for free and does not require a license. Note that real-time tracking to CalTopo does require a paid license, but offline tracking and seamlessly uploading recorded tracks remain free for all users.
Note: You can also download offline base maps from CalTopo and load them into Eagle Eyes so you have reliable reference maps when flying offline. This works by downloading MBTiles from CalTopo and uploading them into Eagle Eyes Pilot, allowing the map tiles to be stored directly on your controller for use without an internet connection.
Run the latest version of Eagle Eyes Pilot for the best livestreaming experience. On your drone controller, go to EagleEyesSearch.com and tap Get Eagle Eyes on the main page. That brings you to the download page, where you can install the latest version straight onto the controller.
Contents
→ Streaming over your own local Wi‑Fi, free
→ Internet-based streaming, an add-on
→ How many viewers can watch, and what it costs
→ What if credits run out mid-flight?
→ How do I start a livestream?
→ Who can see my livestream?
→ How do viewers open the livestream?
→ What do viewers see?
Streaming over your own local Wi‑Fi is free. You can livestream to up to 3 viewers on the same local Wi‑Fi network as your controller at no cost, on any Eagle Eyes account, both Pro and Free. Nothing is metered and no livestreaming credits are used.
Past 3 local viewers, Eagle Eyes moves the stream onto the internet instead of serving it from the controller. Your controller is flying the aircraft at the same time as it serves a local stream, and we keep that limit conservative so the two do not compete. It protects the flight, and it keeps the stream steady for the viewers already watching.
Where your viewers are sitting is what decides whether streaming costs anything.
Local Wi‑Fi streaming
Free, on any Eagle Eyes account
Nothing metered and no livestreaming credits used. Viewers watch in a web browser on a laptop or phone, or in the Eagle Eyes Mirada desktop app.
Internet streaming
$Costs money, metered with credits
See below for internet prices
The prices below are for internet-based streaming, to remote viewers who are not on your same local Wi‑Fi network.
Internet-based streaming is an add-on. It is not part of a subscription.
Livestreaming works in both modes of the Eagle Eyes app on your drone controller. Free accounts fly in Companion Mode, which runs alongside DJI Pilot 2 or DJI Fly. Pro accounts can fly in either Piloting Mode, where the Eagle Eyes detector runs live and your detections go out with the stream, or Companion Mode. Credits work the same in both.
You pay per minute streamed, not per viewer. Ten people watching a ten minute stream costs ten minutes, the same as one person watching for ten minutes. Nothing is charged while nobody is watching from outside your network, so a stream with only local viewers on it stays free.
$Internet streaming is the paid part. These prices apply only to viewers outside your local Wi‑Fi network.
Billed by the minute, and only while someone is watching remotely. The 10 viewer cap is a default, and you can raise it any time at eagleeyessearch.com/account.
What if credits run out mid-flight?
Internet streaming stops until you top up, and local Wi‑Fi streaming carries on. While you are streaming, Eagle Eyes Pilot shows your credit balance and whether the current stream is drawing on it, so you get warning before it runs out. Topping up takes a couple of clicks from your account on any device with internet.
For internet streaming, use a stable connection such as Starlink, Wi‑Fi, or a strong mobile hotspot.
How do I start a livestream?
From the Eagle Eyes Pilot home screen, tap the Live Stream card. If you are already in fly mode, tap the livestreaming icon at the top of the screen, or go to Menu → Livestreaming. Then tap Start Streaming and wait for it to connect. A QR code and link appear on the controller screen. Streaming over the internet needs Eagle Eyes Pilot 1.7.1 or later.
Livestreaming in Eagle Eyes, starting at the livestreaming walkthrough.
Free live streaming and live tracking to CalTopo.
Who can see my livestream?
Anyone holding the link can watch, and whoever you send it to can pass it on. If you need to keep a stream to a known group, put a password on it.
In Eagle Eyes Pilot, the livestreaming dialog that shows the QR code has a password field. Enter one there before you tap Start Streaming. Anyone opening the link is then asked for the password before any video plays, and you pass that password only to the people you want watching.
How do viewers open the livestream?
Viewers can:
In CalTopo, click on the drone on the map, then select the livestream option. The livestream opens in a new browser tab.
What do viewers see?
Live streams open in the Eagle Eyes Mirada web app or the Mirada desktop app, with the live drone video alongside a synced map showing the drone's location and your CalTopo map objects. If the pilot has a paid account with detection running, their detections come through with the stream. Running the detector is the paid part. Watching is free for everyone, with no account and no license needed.
Questions about livestreaming, or trouble getting a stream running? Reach out at info@EagleEyesSearch.com and we will help you get set up.
Contents
→ What are flight missions?
→ Which mission type should I use?
→ Line & Corridor missions
→ Grid missions
→ Setting grid parameters
→ Review, fly, or export
→ Saved missions
→ Processing the imagery afterward
What are flight missions?
Flight missions are available in Eagle Eyes Pilot 1.7.1 and up. They let the drone fly a search pattern automatically and capture photos or video as it goes, instead of flying every pass by hand. You plan the mission on the map, review the preview, and launch.
Mini missions. Since Eagle Eyes Pilot 1.8.0, missions also fly on DJI Mini drones. You can fly autonomous search missions with the DJI Mini 3, Mini 3 Pro, and Mini 4 Pro, the kind of grid, line, corridor, and polygon coverage missions DJI's own apps do not offer for the Mini series. See How do I fly autonomous missions with a DJI Mini drone? for the details, and the compatibility page for supported drones and controllers.
Terrain-following missions. Missions can fly relative to the terrain below the aircraft, not just at a fixed altitude from the launch point. Set a height above ground level and the aircraft holds it for the whole mission, so your ground sampling stays consistent from valley floor to ridgeline. There are two ways to do it: AGL missions, planned from terrain data before takeoff, which work with any aircraft Eagle Eyes Pilot flies in Piloting Mode, and Live Terrain Following, measured by the aircraft's own sensors in flight (Matrice 4 Series and Matrice 400). However a mission sets its height, you as the pilot are responsible for staying within the rules of the airspace you fly in. See What is the difference between AGL missions and Live Terrain Following? and What terrain data do AGL missions use?
Why fly an automated mission:
Which mission type should I use?
Eagle Eyes supports the following flight mission types:
Line & Corridor
Grid
Line & Corridor missions
A Line mission flies a single path along a feature. A Corridor mission flies parallel passes on either side of that feature for wider coverage. Both are based on a line drawn in the Eagle Eyes Pilot app or imported from CalTopo, and both support photo and video with configurable overlap.
Building a Line or Corridor mission
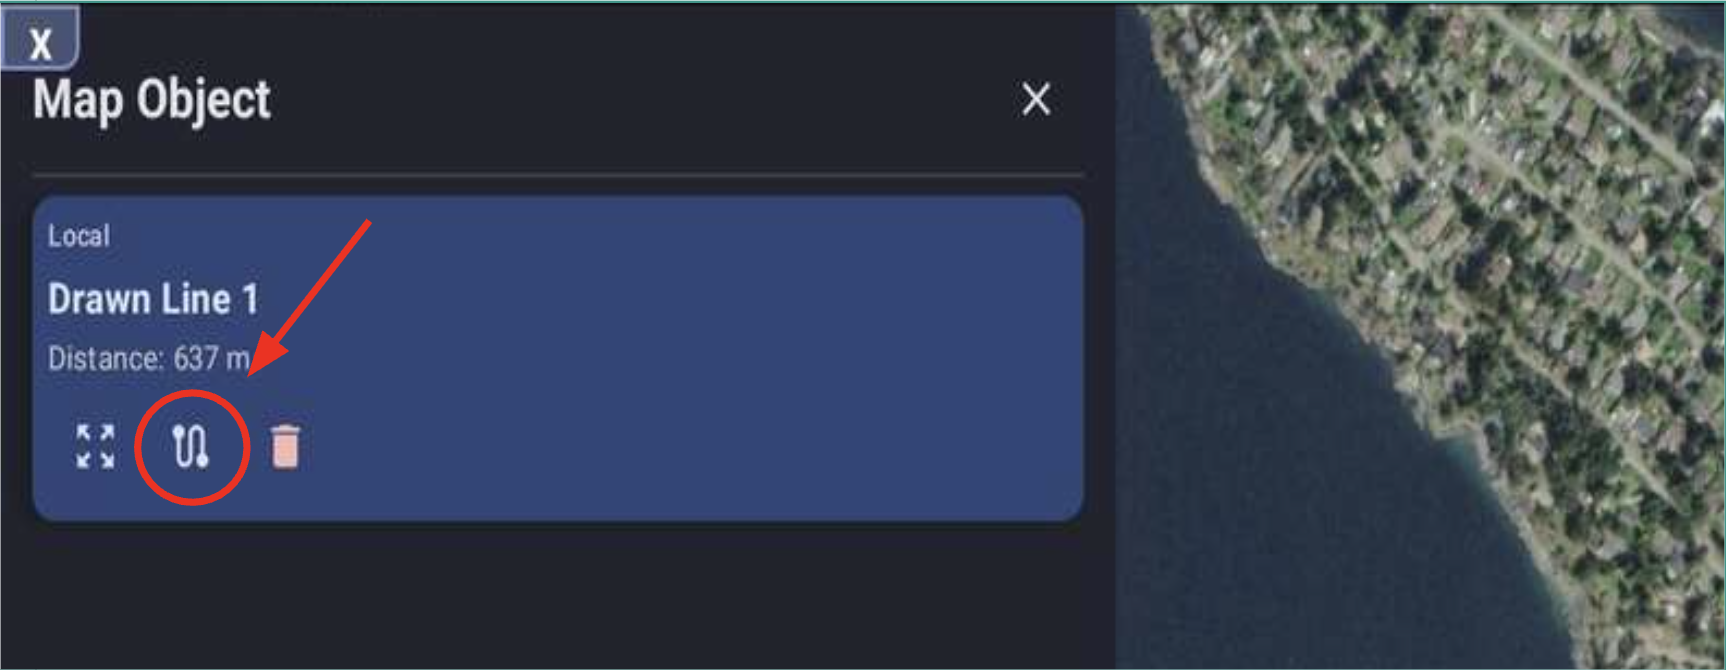
Open a line mission: tap a line on the map, then the line-mission icon.
Grid missions
A Grid mission flies back-and-forth parallel passes to cover an area uniformly. It is based on a polygon drawn in the app or imported from CalTopo. If you need to draw one, tap the draw tool, sketch the polygon, tap Finish, name it, choose whether to upload it to CalTopo, and save.
Building a Grid mission
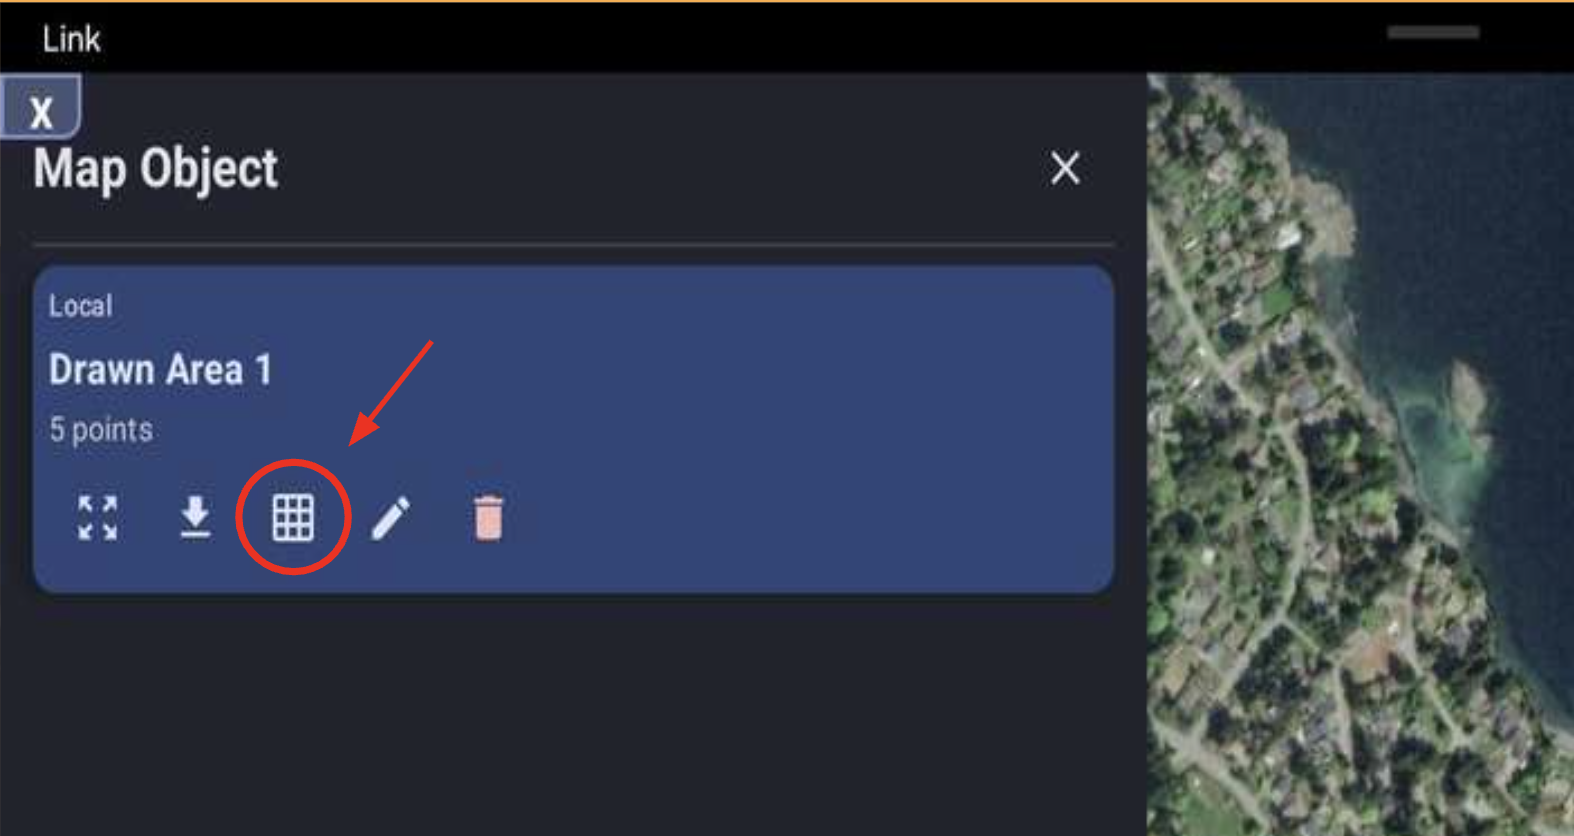
Open a grid mission: tap a drawn area, then the grid icon.
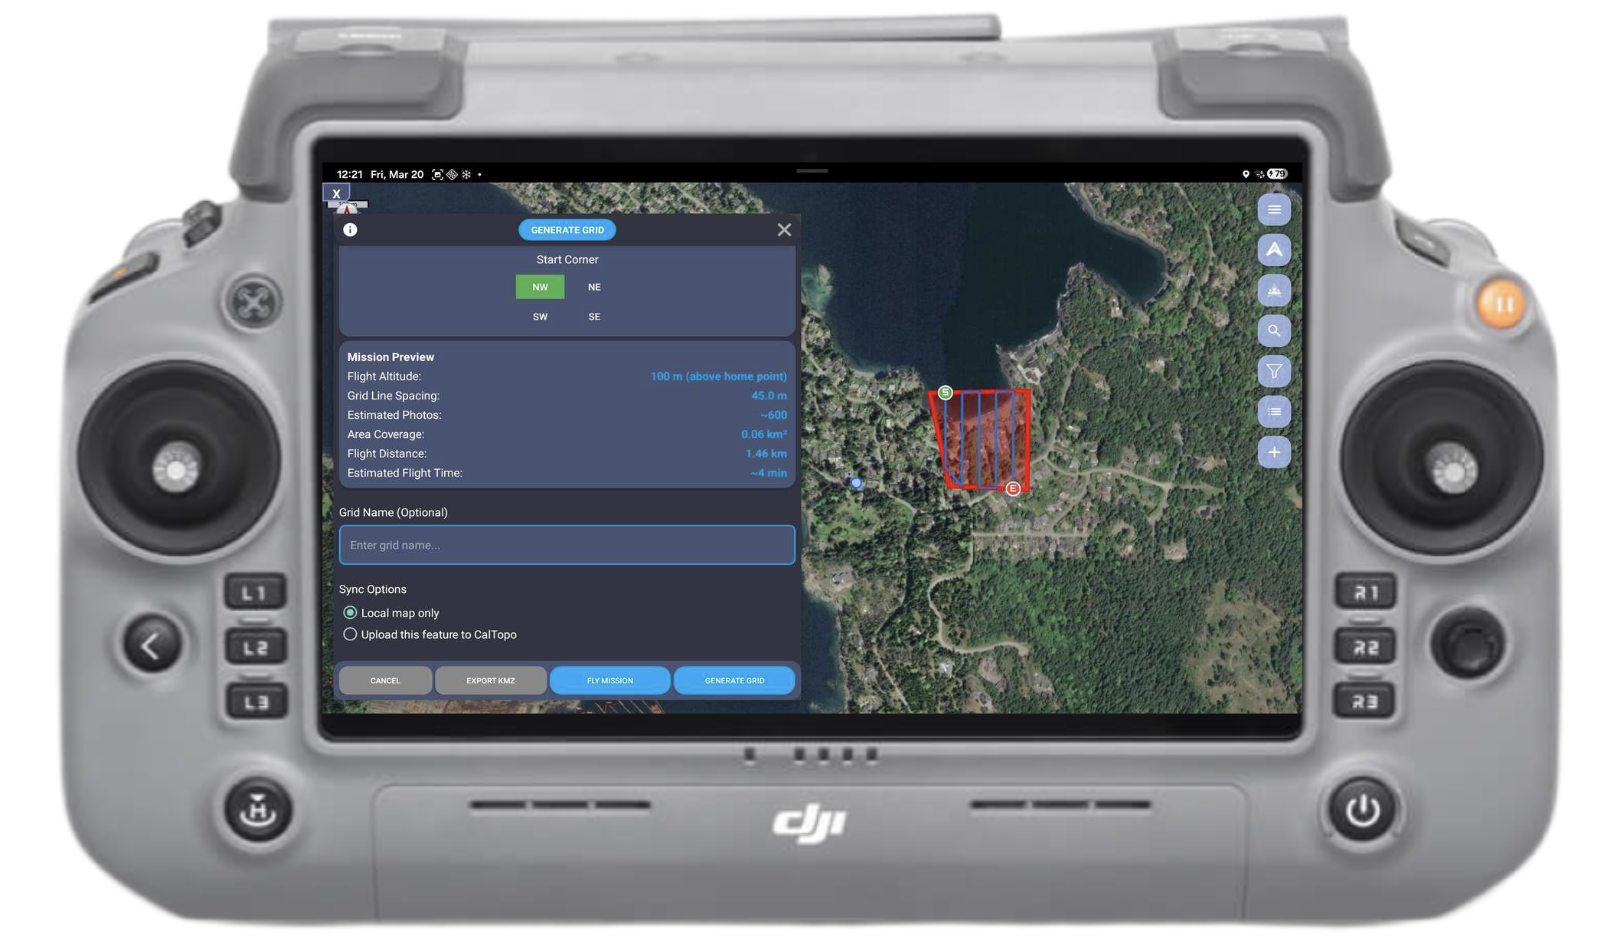
The Generate Grid dialog, with a live mission preview.
Setting grid parameters
Fine-tune the pattern with grid line spacing, overlap percentage, IR camera, grid orientation, and the start corner (NW, NE, SW, or SE). The Mission Preview updates in real time as you adjust, showing flight altitude, estimated photos, area coverage, flight distance, and estimated flight time.
Review, fly, or export
When the pattern looks right, you have three options:
While the mission flies itself, you or a teammate can watch the feed and the map for detections as coverage proceeds.
Saved missions
Missions you create are saved so you can return to them later.
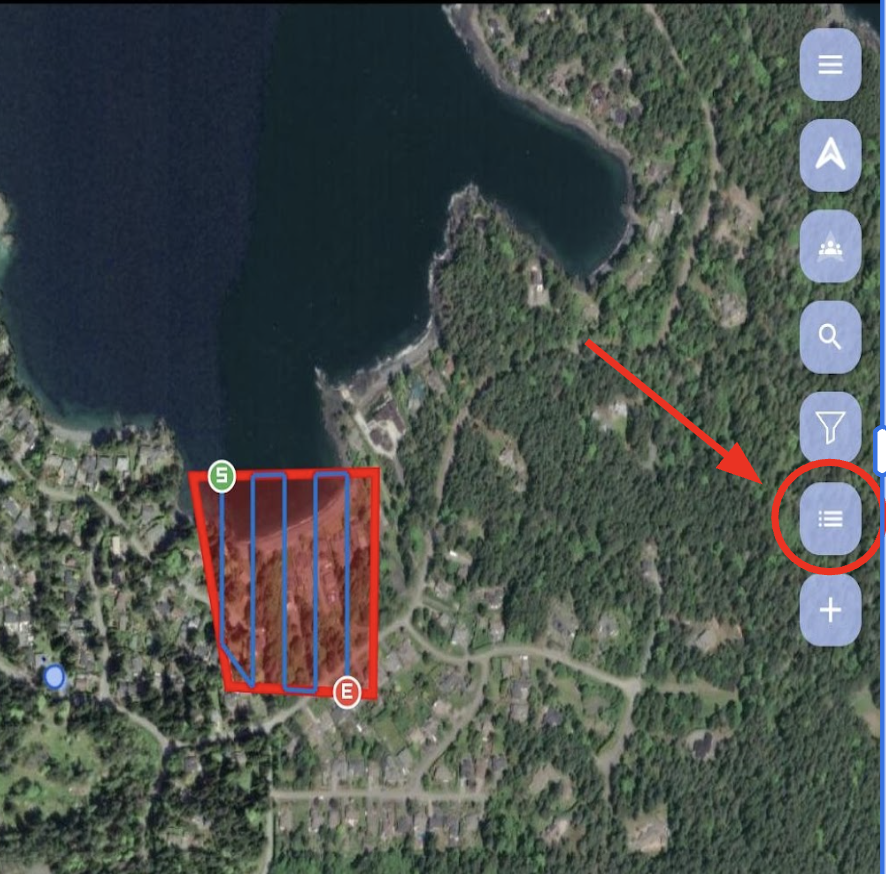
Find saved missions in the map toolbar.
Processing the imagery afterward
To review all the imagery a grid mission captures, process it after the flight in Eagle Eyes Mirada.
Mini missions in action, a recording from our live webinar in July 2026.
Eagle Eyes Pilot flies autonomous search missions on the DJI Mini 3, Mini 3 Pro, and Mini 4 Pro. Plan a grid, line, corridor, or polygon mission on the map, review the preview, and launch, the same way missions work on DJI Enterprise aircraft. These are coverage missions DJI's own apps do not offer for the Mini series.
To fly Mini missions you need the Eagle Eyes app in Piloting Mode, version 1.8 or later. See the compatibility page for supported drones and controllers, and How do automated flight missions work? for planning, flying, saving, and exporting missions.

Nearby drones appear live on the map on the controller screen. A DJI RC Plus 2 in DJI Pilot 2 with Companion Mode running, and a DroneTag Rider connected over Bluetooth.
 DJI Pilot 2
 DJI Fly
Eagle Eyes app in Companion Mode
DJI Fly
Eagle Eyes app in Companion Mode
 Eagle Eyes Pilot
in Piloting Mode
Eagle Eyes Pilot
in Piloting Mode
 Mirada
on your computer
Mirada
on your computer
Connect a Remote ID receiver to the Eagle Eyes app on your DJI drone controller, and drones broadcasting Remote ID around you appear live on your map as you fly. It works in both ways of running the Eagle Eyes app. In Piloting Mode, where Eagle Eyes is your full piloting app with the detector and autonomous missions, and in free Companion Mode, where the Eagle Eyes app runs in the background while you fly in DJI Pilot 2 or DJI Fly. See What is Companion Mode? for the difference. It needs Eagle Eyes app version 1.8 or later, free or paid.
A receiver also plugs into a laptop running Eagle Eyes Mirada on Windows or macOS, for watching the airspace around a site. If anyone on the incident has an RID receiver connected to the Eagle Eyes app or to Mirada, nearby drones that are not running Eagle Eyes at all are picked up over Remote ID and added to the same shared airspace picture, so whoever is managing air operations has the whole picture.
New to Remote ID? Find out more here.

Our plug-and-play receiver. Ships ready to go, USB-C cable included.
Mirada on your laptop Eagle Eyes app on your controller
The most versatile option. Connects to Eagle Eyes by USB cable or wirelessly over Bluetooth.
Mirada on your laptopEagle Eyes app on your controller
DroneTag's standalone receiver, for watching the airspace around a site.
Mirada on your laptop
DroneScout's compact receiver connects to Eagle Eyes too.
Mirada on your laptop
Bring your own Meshtastic-ecosystem unit and flash Eagle Eyes RID firmware onto it.
Mirada on your laptopEagle Eyes app on your controllerEach card shows whether the receiver works with the Eagle Eyes app on your drone controller, with Mirada on your laptop, or both. Full details, demo videos, and a quick start guide are on our Remote ID receiver page. Mirada can also connect straight to the DroneTag API with free DroneTag credentials, no receiver of your own required.
You pay for the receiver or the firmware once, or bring an RID receiver you already have. The Remote ID integration side of Eagle Eyes is free, including sharing what your receiver hears with other Eagle Eyes users on your operation, so everyone flying works from the same airspace picture. If you have an RID receiver we do not support, please reach out to us at info@EagleEyesSearch.com.
Receiver or broadcast module? They are opposites. A Remote ID broadcast module transmits. You attach one to a drone that has no built-in Remote ID, and it broadcasts that drone's identity and position, which is what the Remote ID regulations require. DroneTag is a well-known maker of them. A Remote ID receiver listens. It picks up those broadcasts so you can see the drones flying around you. Eagle Eyes uses receivers, and the Eagle Eyes RID receiver hears both drones with Remote ID built in and drones fitted with broadcast modules, such as DroneTag transmitters.
See it in action
Turn your drone controller into a Remote ID receiver with the Eagle Eyes RID receiver.
Connect an Eagle Eyes RID receiver to your laptop running Eagle Eyes Mirada.
You can use Eagle Eyes Pilot and Mirada together. The benefit is that you will be able to transmit live video and live coordinates to a nearby laptop for analysis. You can do this by either piloting the drone directly in Eagle Eyes Pilot, or by flying with DJI Pilot 2 while running Eagle Eyes Pilot in the background. Connect the controller to your computer using an HDMI cable and capture card for the video feed, while live coordinates are transmitted wirelessly.
You don't need to run Eagle Eyes Pilot on the controller to get a live feed into Eagle Eyes Mirada. But doing so enables live coordinate transmission, which lets Mirada show the drone's live position and track on its map.
Alternatively, you can skip the HDMI cable entirely: start a livestream in Eagle Eyes Pilot and open it in Mirada. On the same Wi-Fi network this is free of charge; over the internet it uses livestreaming credits. See how livestreaming works. Mirada can follow multiple drones live on its map at the same time.
The video below explains the setup and process.
This video shows Eagle Eyes Pilot with our previous desktop app, Eagle Eyes Scan. The setup works the same with Mirada.
High Res Detect lets you capture a photo in Eagle Eyes Pilot and run the Eagle Eyes detector on the full resolution image your drone camera captured, while the drone is still up in the air. This is not the same image you watch while you fly. The live view on your controller screen is compressed to travel over the RC connection; High Res Detect runs on the full resolution photo saved by the camera itself, so the detector sees the full detail your camera is capable of. Tap any of the up to 20 detections that come back to zoom straight in and investigate, while the drone is still flying.
For instructions on how to do this, view the video below.
See also how the detector works and how to review detections.
Interval photo capture in DJI Pilot 2 is timed, so the camera fires every few seconds whether or not anything in view has changed. Eagle Eyes Pilot captures on overlap instead. It uses computer vision to track how much of the camera's view is new, and fires the next photo once enough of it has changed. You set that threshold as a percentage: at the 50% default, a photo fires when half the pixels in view are new.
You get consistent coverage of everything you looked at, without stacks of duplicates. If the drone hovers in place, it simply waits until it is looking at something new.
Capture on overlap, not on a timer
The diagram shows a straight-down nadir capture, but overlap capture works whichever way the camera is pointed: down, forward, off to the side, or anywhere in between. Moving the drone and panning the gimbal both count as change.
When the drone hovers
For instructions on how to do this, view the video below.
Pick your overlap threshold the same way you'd pick a timed interval, 50% here, which is the app default. When the camera's view has changed past it, whether the drone moved or the gimbal panned, Eagle Eyes Pilot takes the next photo. Full coverage of everything you fly over, no stacks of duplicates, and if the drone hovers, it simply waits.
Companion Mode (formerly "Background Mode") lets Eagle Eyes Pilot run alongside the DJI Pilot 2 or DJI Fly app, so you fly with the full native DJI piloting app experience while Eagle Eyes sits quietly in the background, broadcasting telemetry, syncing your drone's live location to CalTopo, and livestreaming what your drone is seeing. It does this with no impact on the control or the safety of your flight, and without interfering with the DJI app while you fly. Detection does not run in Companion Mode. To run detection you have to turn off Companion Mode and use Eagle Eyes Pilot as your main piloting app, which requires a Pro Eagle Eyes license and a compatible DJI drone (see the compatibility overview).
Installing a third-party app on your drone controller is something you should rightfully be careful about. So here is what the Eagle Eyes app does in Companion Mode, and what it does not.
It runs quietly in the background. Install the free Eagle Eyes app on your drone controller and fly in DJI Pilot 2 or DJI Fly exactly as always. Your piloting app keeps full control of the drone.
It never connects to your drone. In Companion Mode the app does not connect to the aircraft. DJI's own app makes the drone's live location available on the controller, and Eagle Eyes simply reads it there.
It shares your position with the people you choose. Position and altitude go out to your team's CalTopo map, your livestream viewers, and the other Eagle Eyes users you share with. There is no impact on the control or the safety of your flight.
Walkthrough video
Not to be confused with a dual controller setup. Both Companion Mode and Piloting Mode run on one controller. They are two different ways to use the Eagle Eyes app on it.

The way you are used to flying, with the Eagle Eyes Pilot app as your full piloting app. Custom autonomous missions, and the Eagle Eyes detector running live on your controller as you fly.
 Companion Mode running
The Eagle Eyes app installed on your drone controller runs in the background, similar to apps like Airdata, and does not interfere while you fly in DJI Pilot 2 or DJI Fly.
Companion Mode works with a wide range of drones. See the compatibility list for the full picture.

Skydio does not allow third-party apps on its controllers, so Companion Mode cannot run there. We are working on an integration for Skydio drones through Eagle Eyes Mirada, our desktop and web app.
When you first download the Eagle Eyes app and activate a free account, it starts in Companion Mode by default.
If you are in Piloting Mode and want to switch to Companion Mode:
| Feature | Status |
|---|---|
| Detection | ❌ Requires Eagle Eyes as the main piloting app |
| Telemetry broadcast | ✅ Full functionality |
| CalTopo sync | ✅ Full functionality |
| Livestreaming | ✅ Via screen capture |
| Camera / gimbal control | ❌ Controlled by the DJI app |
| Flight missions | ❌ Use the DJI app |
The easiest way is with the pin/camera icon under the map on the right side of the Pilot app view:
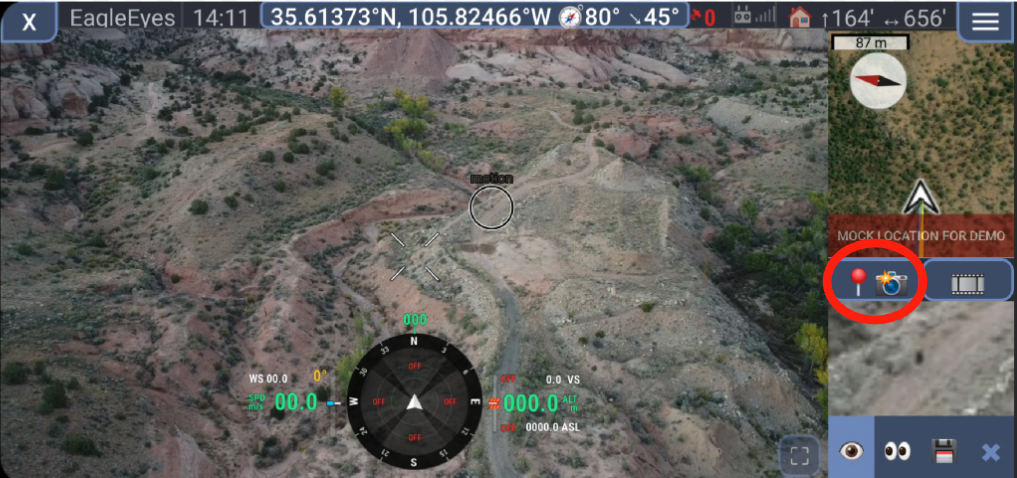
Tap it and a dialog will pop up.
By default, "Capture View" is selected. Open the dropdown and choose No photo, just add a marker.
.png)
Tap Capture then OK, and a marker will save at your current location.
.png)
If your drone has a laser rangefinder:
.png)
With "Mark object using laser measurement" toggled ON, the marker drops at the laser strike point.
With it OFF, the marker saves at the drone's current location.
.png)
To return to a saved point after swapping batteries:
Eagle Eyes Pilot has a setting to recalibrate and re-center the gimbal.
.png)
.png)
.png)
Visit our comprehensive FAQ page for all questions and answers.
View All FAQs